
I wanted to make a k8s cluster for fun, but didn't know how I could show it off. So I made this blog and hosted it on the cluster, so I can talk about how I built the cluster.
This post will run through how I set up my Kubernetes cluster, deployed an application on it, and exposed it to the Internet.
Note, I will be heavily over-engineering this. There are much easier ways to do this than the route I went for. However, I find this way has the advantage of being able to quickly re-create my cluster on demand. In fact, I actually used it to easily migrate my cluster between different cloud providers.
Tools I'll be using
I'll be using the following stuff
For the cloud provider, I used Hetzner, because they're cheap. GCP gives away $300 (at time of writing).
The authentication method (for Terraform and to ssh into instances) will be different for each provider, so If you're making your own, be sure to look at the docs for specific instructions on authenticating between the tools.
For Hetzner, I:
- Created an access token for use with Terraform
- Added my public key, so I can ssh to instances.
What I'm building
The objective is simple.
- Spin some virtual machines
- Create a Kubernetes cluster
- Deploy something to the cluster
The specifics of what I'm deploying aren't actually that important. I just want a way to deploy whatever my special interest of the month happens to me.
For part 1, I'm just going to create some stock Ubuntu virtual machines.
For part 2, I'll be using k3s. K3s is a Kubernetes distribution that is meant to be lightweight, so it's less resource intensive. Hence, you'll be able to run it on much smaller machines (albeit without a lot of the bells and whistles). This is perfect for a hobby project.
For part 3, I decided to install Ghost: A blogging platform that I discovered after 2 mins of readings Reddit posts extensive research. It has many features that I am sure are useful, but the most important one is that it has a docker image I can use, which means less setup work in packaging something into a container. Note that ghost has 2 parts, the application and the database. I'll also need something to issue SSL certifications, so people can get to the site with https.
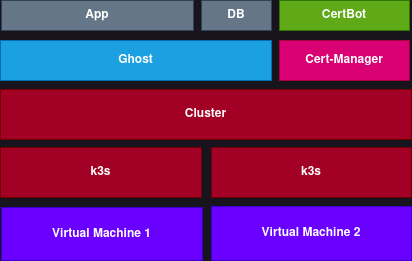
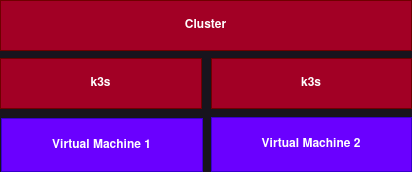
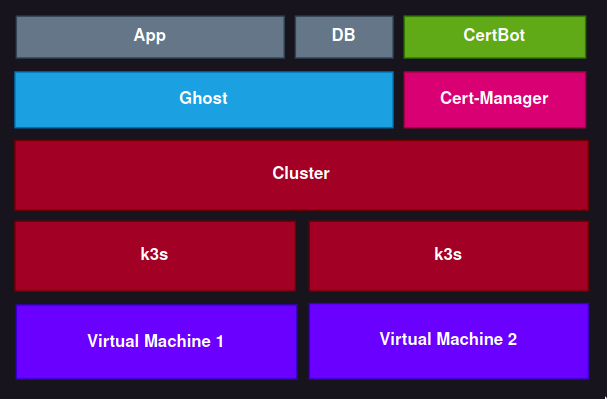
The final cluster should look something like this:
Each layer is built on top of the one below. K3s runs on the virtual machines, Kubernetes cluster runs on k3s nodes, ghost runs on Kubernetes.
How I'm building it
I'm going to build it layer by layer.
- Infrastructure - I'll need Virtual Machines to run my app. I'll be using Terraform to spin up my instances.
- Kubernetes - To install k3s, I'll need to ssh onto each node and install it. However, that is long, so I'll be automating that task with Ansible, allowing me to re-run it to ensure every node is connected to the cluster.
- Helm Chart - Helm is a way to template the YAML specs needed for Kubernetes, and provides a nice way for organizing the cluster. I'm actually going to be installing 2 charts. The main Ghost app, and certbot. Certbot is just to get SSL certs, so it can serve HTTPS traffic.
1. Infrastructure

Getting Started with Terraform
To get started with terraform, l'll need to create two files. Aprovider.tf to hold information about your cloud provider. And a terraform.tfvars to hold secrets.
My provider.tf looks like this
# Input your own provider here
terraform {
  required_providers {
    hcloud = {
      source = "hetznercloud/hcloud"
      version = "1.41.0"
    }
  }
}

# Configure provider here
provider "hcloud" {
  token = var.hcloud_token # Get the token from your cloud provider
}

# You hcloud API token
variable "hcloud_token" {
  sensitive = true
}

# Private ssh key (local)
variable "pvt_key" {
}

# ssh_key saved on hcloud
data "hcloud_ssh_key" "my_ssh_key" {
  name = "some-name"

}
And my terraform.tfvars looks like this
hcloud_token = "super-secret-token"
pvt_key = "~/.ssh/id_rsa"
And then I'll just need to run
$ terraform initThis will download files for the specific cloud provider.
Creating the cluster
Now I'm going to make a cluster.tf file to specify how to create a cluster. They'll vary slightly depending on cloud provider, but will mostly be the same.
# Virtual machine 1
resource "hcloud_server" "solari_1" {
  image  = "ubuntu-22.04" # vm image
  name   = "solari-1" # name of virtual machine
  server_type = "cx21"
  location = "fsn1"

  ssh_keys = [
    data.hcloud_ssh_key.my_ssh_key.id # your ssh key from your cloud provider
  ]
  # label your nodes
  labels = {
    "k8s_node": "senpai"
  }
  connection {
    host        = self.ipv4_address
    user        = "root"
    type        = "ssh"
    private_key = file(var.pvt_key)
    timeout     = "2m"
  }
}

# Virtual machine 2
resource "hcloud_server" "solari_2" {
  image  = "ubuntu-22.04"
  name   = "solari-2"
  server_type = "cx11"
  location = "fsn1"

  ssh_keys = [
    data.hcloud_ssh_key.my_ssh_key.id
  ]
  labels = {
    "k8s_node": "kouhai"
  }
  connection {
    host        = self.ipv4_address
    user        = "root"
    type        = "ssh"
    private_key = file(var.pvt_key)
    timeout     = "2m"
  }
}

# Virtual machine 3
resource "hcloud_server" "solari_3" {
  image  = "ubuntu-22.04"
  name   = "solari-3"
  server_type = "cx11"
  location = "fsn1"

  ssh_keys = [
    data.hcloud_ssh_key.my_ssh_key.id
  ]
  labels = {
    "k8s_node": "kouhai"
  }
  connection {
    host        = self.ipv4_address
    user        = "root"
    type        = "ssh"
    private_key = file(var.pvt_key)
    timeout     = "2m"
  }
}
I'm making sure to tag the nodes appropriately. I'm making a main node (senpai) which will hold the control plane, and several worker nodes (kouhai).
To check it, I ran
$ terraform plan -out tfplanThe -out tfplan is going to create a plan file I can pass into the apply command. This is just in case the state changes between the time I run plan and when I run apply. Can't be too careful.
And then, when it looks good, I can run
$ terraform apply tfplanAnd with that, I have some virtual machines to do stuff.
2. Kubernetes
K3s is easy to install, you can curl the shell script and run it. But you have to do that on each node, which would have been tens of minutes of my time. That is simply unacceptable. So I'll be automating it with Ansible
Getting started with Ansible
Ansible works by running commands on remote machines. With it, I can have Ansible run the install script on each machine and have it register to the cluster. This way I can expand/downsize the cluster as I feel like.
I'll need to tell Ansible where my machines are. This is typically done via an inventory. I could specify the IP addresses of my machines manually, but I prefer to use a dynamic inventory. These will get a list of my virtual machines from the cloud provider.
A dynamic inventory for hcloud looks like this
# inventory.hcloud.yaml
plugin: hetzner.hcloud.hcloud
keyed_groups: # This puts the labels on the machines into ansible groups
  - key: "labels.k8s_node"
    separator: ""
I can use the inventory by just passing it into my Ansible commands with -i.
You can test this works by running the following (Make sure you've logged into hcloud or your whichever CLI tool you're using)
$ ansible-inventory -i inventory.hcloud.yaml --graphThis will display the nodes and the groups they're in. The nodes will be important for the next part.
@all:
  |--@ungrouped:
  |--@hcloud:
  |  |--solari-2
  |  |--solari-1
  |  |--solari-3
  |--@kouhai:
  |  |--solari-2
  |  |--solari-3
  |--@senpai:
  |  |--solari-1
Installing k3s
To actually have Ansible install k3s, I'll need to create a playbook. The playbook contains a set of tasks that are executed in order. What I want it to do is:
- Download k3s script on all nodes
- Install k3s on senpai node
- Get the k3s token from the senpai node
- install k3s on kouhai nodes with the senpai node IP and token
I'll write the playbook to do each of these tasks. My playbook looks like this:
# install_k3s.yaml
- hosts: all
  tasks:
    - name: Create staging directory
      file:
        path: /k3s
        state: directory
    - name: Download k3s install script
      get_url:
        url: https://get.k3s.io
        dest: /k3s/install.sh
        owner: root
        group: root
        mode: 0755
- hosts: senpai
  tasks:
    - name: Install k3s on senpai node
      shell: '/k3s/install.sh'
      args:
        chdir: /k3s
        creates: /etc/rancher/k3s/k3s.yaml
    - name: Get k3s token
      shell: 'cat /var/lib/rancher/k3s/server/node-token'
      register: k3s_token
    - name: save k3s token
      copy:
        content: "{{k3s_token.stdout}}"
        dest: /tmp/node-token
      delegate_to: localhost
    - name: get k3s config
      fetch:
        src: /etc/rancher/k3s/k3s.yaml
        dest: ./config/
- hosts: kouhai
  tasks:
    - name: read k3s token
      shell: 'cat /tmp/node-token'
      delegate_to: localhost
      register: k3s_token
    - name: Install k3s on other nodes
      shell: '/k3s/install.sh'
      args:
        chdir: /k3s
        creates: /etc/rancher/k3s/k3s.yaml
      environment:
        K3S_URL: "https://{{ hostvars[groups['senpai'][0]]['ansible_default_ipv4']['address'] }}:6443"
        K3S_TOKEN: "{{ k3s_token.stdout }}"
      register: k3s_worker_install
To run the playbook, I can use
$ ansible-playbook -i inventory.hcloud.yaml install_k3s.yamlAnd with that, k3s installed on all the machines.
To verify, I can ssh to any machine and run:
$ k3s kubectl get nodesGetting the kubectl credentials
I don't want to ssh in every time I want to run some commands. Ideally, I'd run kubectl commands from my local.
In order to do that, I need to merge the kube config file on a k3s node into my local kube config. This is just a matter of getting the /etc/rancher/k3s/k3s.yaml file from a node and merging the contents into my local ~/.kube/config.
And with that, my cluster is all set up.
3. Helm Chart(s)
Now to actually deploy the app. I'll need to make a helm chart. A chart is essentially just a directory with a Chart.yaml and a templates folder with all the k8s yamls for the app.
A Ghost blog will have 2 parts, the application and the database. Each in their own container. They'll also need some data storage attached to them, so they can persist. The full chart will look like this:
Chart.yaml
templates/
    ghost.deployment.yaml
    ghost-app.pvc.yaml
    ghost-app.service.yaml
    ingress.yaml
    ghost-db.pvc.yaml
_values.yamlghost.deployment.yaml- The actual deployment running the ghost and db containers. I put them in the same pod because I was being lazy, and this project has gone on for way too long. Fite me.
apiVersion: apps/v1
kind: Deployment
metadata:
  labels:
    app: ghost
  name: ghost
  namespace: default
spec:
  replicas: 1
  selector:
    matchLabels:
      app: ghost
  template:
    metadata:
      labels:
        app: ghost
    spec:
      volumes:
        - name: ghost-local-pv
          persistentVolumeClaim:
            claimName: ghost-local-pvc
        - name: ghost-db-pv
          persistentVolumeClaim:
            claimName: ghost-db-pvc
      containers:
        - image: ghost:latest
          imagePullPolicy: Always
          name: ghost
          volumeMounts:
            - mountPath: /var/lib/ghost/content
              name: ghost-local-pv
          ports:
            - name: ghost-port
              containerPort: 2368
          env:
            - name: url
              value: {{ .Values.ghost.url }}
            - name: database__client
              value: mysql
            - name: database__connection__host
              value: {{ .Values.ghost.db.host }}
            - name: database__connection__user
              value: {{ .Values.ghost.db.user }}
            - name: database__connection__password
              value: {{ .Values.ghost.db.password }}
            - name: database__connection__database
              value: {{ .Values.ghost.db.database }}
        - image: mariadb:latest
          imagePullPolicy: Always
          name: mariadb
          volumeMounts:
            - mountPath: /var/lib/mysql
              name: ghost-db-pv
          env:
            - name: MYSQL_ROOT_PASSWORD
              value: {{ .Values.ghost.db.root_password }}
            - name: MYSQL_USER
              value: {{ .Values.ghost.db.user }}
            - name: MYSQL_PASSWORD
              value: {{ .Values.ghost.db.password }}
            - name: MYSQL_DATABASE
              value: {{ .Values.ghost.db.database }}
ghost-app.pvc.yaml- Gives storage for the ghost container
kind: PersistentVolumeClaim
apiVersion: v1
metadata:
  name: ghost-local-pvc
spec:
  accessModes:
    - ReadWriteOnce
  resources:
    requests:
storage: 1Gighost-app.service.yaml- exposes the deployment and allows other resources to access it
apiVersion: v1
kind: Service
metadata:
  name: ghost-svc
  labels:
    component: ghost
spec:
  selector:
    app: ghost-app
  ports:
    - name: web
      port: 8443
targetPort: 2368ingress.yaml- exposes the service to the internet and allows you to access a specific service via a URL. Note the annotations here work with the cert-manager to get SSL certs.
apiVersion: networking.k8s.io/v1
kind: Ingress
metadata:
  name: foo
  annotations:
    cert-manager.io/cluster-issuer: "le-sraksha"
spec:
  tls:
    - hosts:
      - sraksha.dev
      secretName: le-sraksha-main
  rules:
    - host: sraksha.dev
      http:
        paths:
          - path: /
            pathType: Prefix
            backend:
              service:
                name: ghost-svc
                port:
name: webghost-db.pvc.yaml- Gives storage for the db
kind: PersistentVolumeClaim
apiVersion: v1
metadata:
  name: ghost-db-pvc
spec:
  accessModes:
    - ReadWriteOnce
  resources:
    requests:
      storage: 1Gi
The values.yaml will contain the variables that helm will insert into the yamls (via the {{ .Values.bla.bla }} syntax). Note that this takes literal strings and helm, by default, doesn't support reading from env vars, which makes secrets a tad awkward. My way around that is to have a _values.yaml and use envsubst syntax like so.
# _values.yaml
ghost:
  url: https://sraksha.dev
  db:
    host: localhost
    user: ghost
    password: ${GHOST_DB_PASSWORD}
    root_password: ${GHOST_DB_ROOT_PASSWORD}
    database: ghostdb
Which then I can run with envsubst < _values.yaml > values.yaml. Which substitutes the env vars, and then use the generated values.yaml for the chart. I can then clean up easily by just removing the values.yaml
Finally, the Chart.yaml is just a yaml file with some info about the chart.
# Chart.yaml
apiVersion: v2
name: ghost-blog
description: Blog
type: application
version: 0.1.1
appVersion: "1.0"
Now I'm almost finished. Final part is SSL certs. I can do that with a public helm chart of cert-manager, which will handle getting certificates from LetsEncrypt. But I want to be able to represent everything in code somehow, so I can re-run it whenever. So I'm going to use helmfile.
Helmfile
helmfile allows you to have a collection of helm charts, either locally or remote, with a helmfile.yaml. I want to define both my local chart and the cert-manager chart.
# helmfile.yaml
repositories:
  - name: jetstack
    url: https://charts.jetstack.io

releases:
  - name: cert-manager
    chart: jetstack/cert-manager
    namespace: cert-manager
    values:
      - installCRDs: true
  - name: ghost-blog
    chart: ./charts/blog
    values:
      - ./charts/blog/values.yaml
For remote charts, you'll have to define the repository where it's stored (In this case, https://charts.jetstack.io), and then use can use it in the releases section.
Finally, after generating the values.yaml, I can run
$ helmfily applyAnd with that, I have my blog up and running.